
Example Protocol for using SQ QuickDry instead of SU-8 for PDMS Soft Lithography
Published by ELEXAN Scientific on May 24th 2025
This example protocol outlines how to use SQ-8 QuickDry photoresist for PDMS soft lithography. Using this method, we successfully patterned PDMS replicas from a master mold with micropatterned squares and circles. PDMS feature sizes 10 µm wide and 50 µm tall were successfully molded and released from the master mold (see Figure 1).
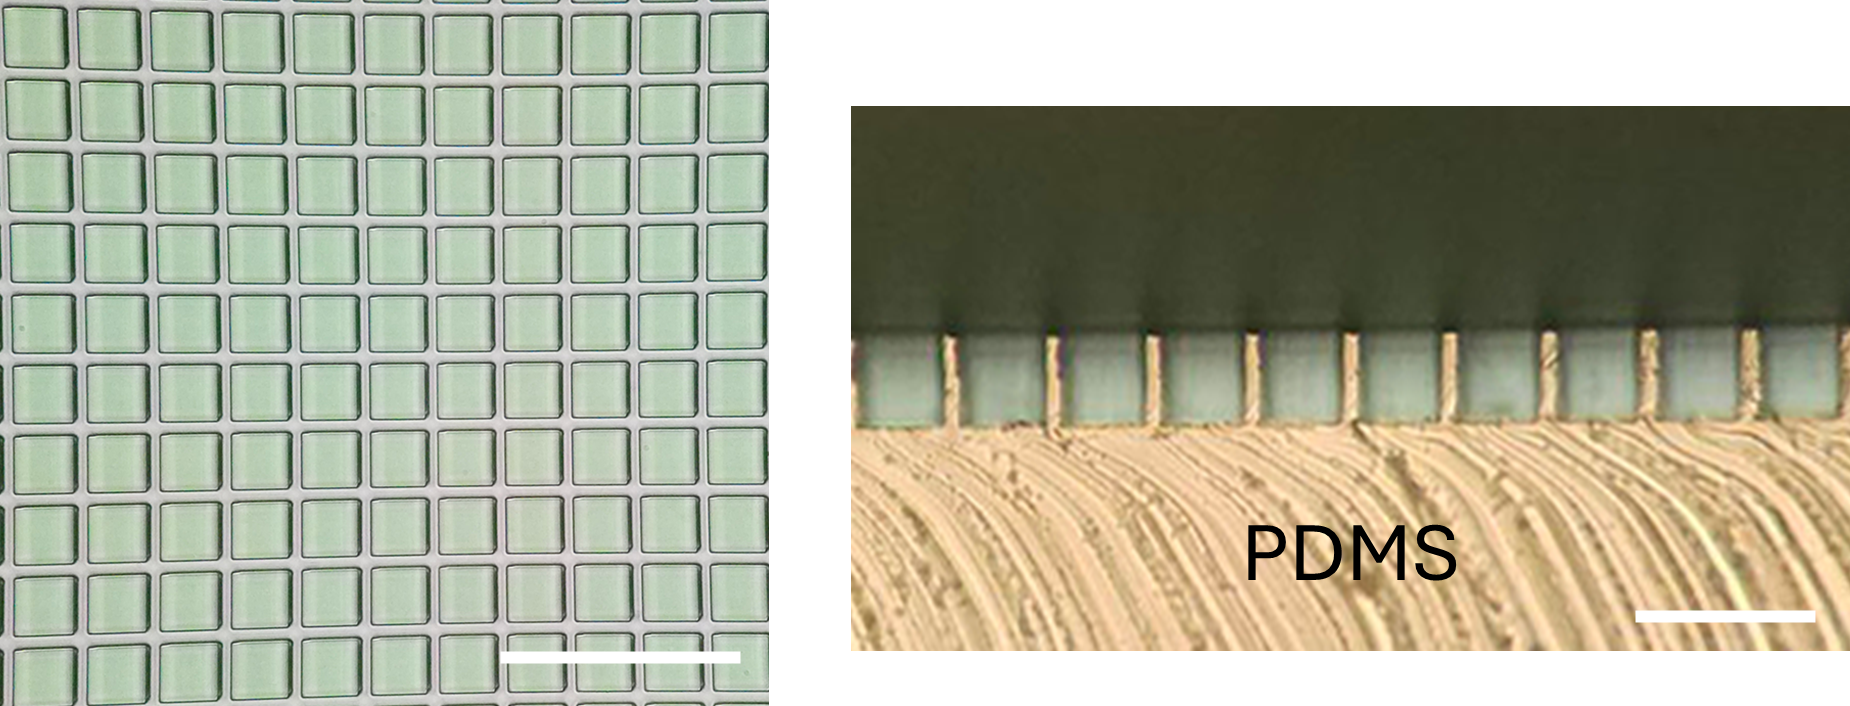 Figure 1. Optical images of photopatterned square array with 45 µm width x lenth and 10 µm spacing from 50 µm film thickness (left) and thick cross section of PDMS replica (right). Shadows from misalignment of optical system. (Scale bar = 200 µm)
Note: This is a reference only. Injury may occur without proper training, personal protective equipment, or fabrication equipment.
PDMS Soft Lithography: A Quick Overview
For those new to soft lithography, here’s the general flow:
- Master mold fabrication using a photoresist (e.g., SQ QuickDry or SU-8) on a silicon wafer.
- Silanize mold to promote PDMS removal
- PDMS casting and curing over the master mold
- Peel-off of the cured PDMS, which now contains a negative replica of the microstructures.
In principle, it’s straightforward. But in practice, the photoresist fabrication step, often requires significant optimization—bake temperatures, exposure doses, and development times—before getting the desired features, which is why we were surprised when everything worked on our first attempt when testing SQ QuickDry.
Master Mold Fabrication using SQ-8 QuickDry on Silicon Wafer
This protocol yielded clean, high-aspect-ratio features in a 50 µm-thick SQ-8 QuickDry film, patterned on recycled silicon wafers with a native oxide surface. Hotplate steps should begin from room temperature and return to room temperature naturally—controlled temperature ramps (e.g., 5 °C/min) are not required with SQ Series photoresists.
- Dehydrate: Bake wafer on hotplate or in an oven to remove moisture
- Clean: Rinse wafer with acetone, followed by IPA; dry with nitrogen
- Spin Coat:
- Dispense QuickDry 25, being careful to avoid bubbles.
- Spin at 500 RPM (100 RPM/s) for 10 seconds and 1000 RPM (500 RPM/s) for 30 seconds to obtain 50 μm film thickness*
- Softbake:
- 65 ˚C for 3 minutes
- 95 ˚C for 7 minutes
- Expose: UV exposure with dose 180 mJ/cm2
- Post Exposure Bake:
- 65 ˚C for 1 minute
- 95 ˚C for 5 minutes
- 65 ˚C for 1 minute
- Develop:
- Immerse in PGMEA (SU-8 developer) with gentle agitation for 6 minutes
- Rinse and dry
- Hardbake: 200 ˚C for 15 min
*Thickness will vary from lab-to-lab depending on equipment and conditions. Use the manufacturer's spin curve as a reference.
Additional Notes:
Standard, MicroCoat, and OptiCoat use GBL as a solvent and does not stick to native oxide layers. Adhesion promoters, such as OmniCoat, can be used if substrate has oxide. QuickDry is a good alternative to substrates with native oxide layers.
Master Mold Silanization
Silanization creates a non-stick surface to prevent PDMS from bonding to the wafer or photoresist features. This step is critical and must be done in a fume hood using appropriate PPE. Harvard's protocol is reliable and simple.¹
Silane agents: PFOCTS, TMCS, and APTES are common. This protocol uses APTES:
- In the fume hood, add five drops of APTES to a small aluminum foil cap and cover.
- Transfer clean wafer and foil cap with APTES into vacuum chamber and pull vacuum.
- Once vacuum pressure is achieved, close valves and turn off pump (if applicable).
- Incubate for 60 minutes.
- Release vacuum and dry master mold on hot plate at 100 ˚C for 15 minutes.
Tip: If a vacuum chamber isn’t available inside the hood, use a sealed container (e.g., large petri dish or Tupperware) instead.
PDMS Molding
To obtain a PDMS replica, the liquid polymer is prepared and deposited onto the master mold.
- Mix 10:1 ratio of PDMS base to curing agent in a plastic cup.
- Stir vigorously or use a mixer.
- Degas in vacuum chamber for ~30 minutes.
- Monitor to avoid overflow from bubbling.
- (Optional) While degassing, secure the silanized mold to a container with double-sided tape.
- Glass containers may chemically bond PDMS.
- Pour or spin coat PDMS onto the mold to achieve desired thickness.
- Degas again with mold for 30 minutes (optional but helpful).
- Ensure tape seals evenly to prevent PDMS from leaking behind the wafer if molding with a container.
- Cure PDMS:
- Room temperature overnight, or
- 60˚ C for >4 hours
- Peel off cured PDMS carefully
Different polystyrene dishes deform at various temperatures—avoid exceeding 60 °C if using them as containers. If PDMS is soft, it is undercured. If the top layer stays sticky even after extended curing, it may not fully crosslink but can usually still be removed off.
Conclusion
SQ QuickDry is a reliable, easy-to-use alternative to SU-8 for PDMS soft lithography. Silanization using APTES worked as expected, and PDMS could be released cleanly from the mold. While the number of reusable cycles for the master mold was not evaluated in this study, it is expected to be comparable to SU-8-based molds.
Ready to switch to from SU-8 to QuickDry? Check it out here!
References
-
Microfluidics/Microfabrication Facility, HMS PROCEDURE for SILANIZATION of SU-8/SILICON MASTER Microfabrication Core Facility, Harvard Medical School.